
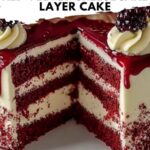
If you want to create a show-stopping dessert that combines rich chocolatey layers with smooth, tangy cheesecake filling, you will absolutely adore this Irresistible Red Velvet Cheesecake Layer Cake to Wow Your Guests Recipe. This cake is a magical blend of vibrant red velvet sponge, velvety cheesecake, and a luscious cream cheese frosting crowned with a glistening berry topping and delicate chocolate accents. It’s not just a dessert—it’s an experience that will make every party or gathering unforgettable. Whether you’re baking for a special occasion or simply craving an indulgent treat, this recipe will have everyone asking for seconds and scribbling down your secret culinary skills.
Ingredients You’ll Need
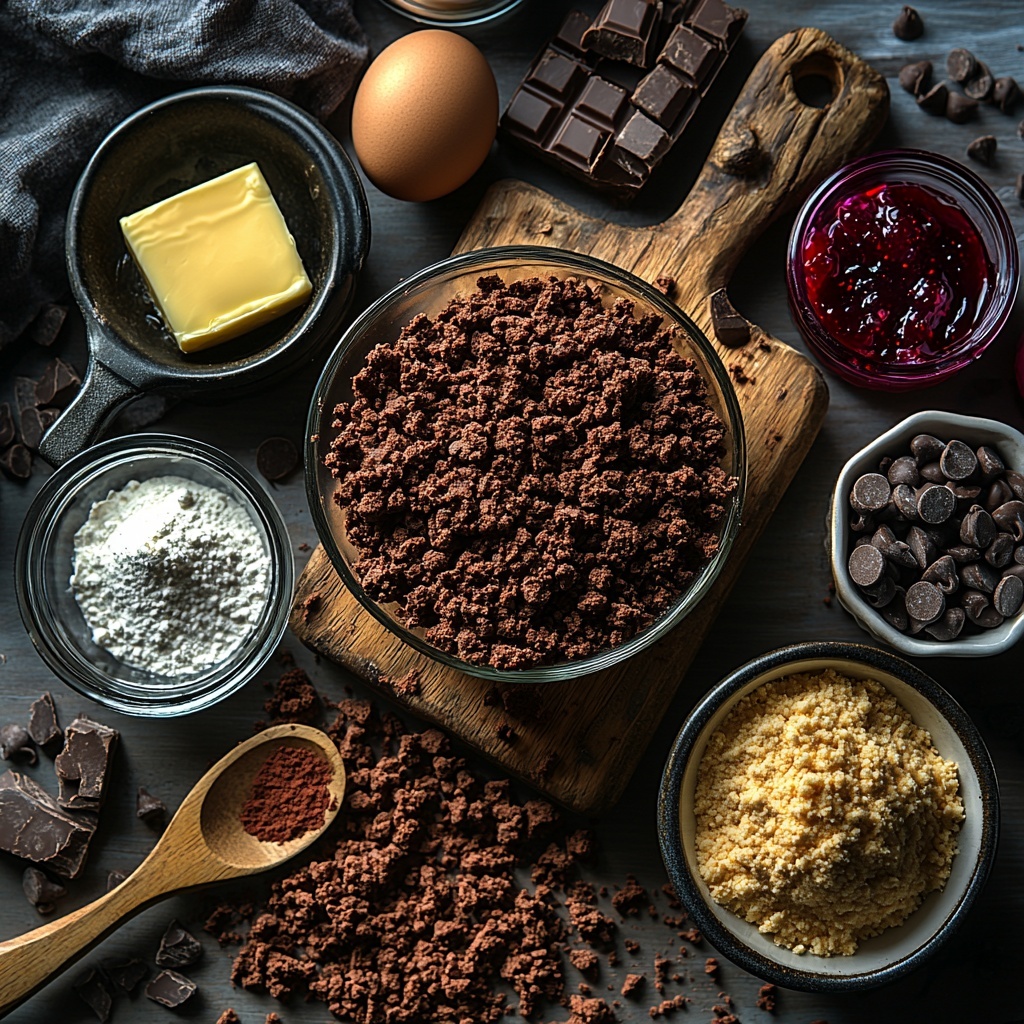
Getting the perfect balance of flavors and textures in this Irresistible Red Velvet Cheesecake Layer Cake to Wow Your Guests Recipe starts with simple, carefully selected ingredients. Each one adds a crucial element, from the tender crumb of the cake to the creamy smoothness of the cheesecake and the brightness of the berry drizzle.
- Chocolate Cookie Crumbs: Adds a flavorful, crunchy base that complements the creamy filling.
- Unsalted Butter: Provides moisture and richness, crucial for a tender crust and cake layers.
- All-Purpose Flour: The foundation of the cake layers, ensuring fluffiness and structure.
- Cocoa Powder: Deepens the chocolate flavor and enriches the red velvet color.
- Baking Soda and Baking Powder: Give the cake lift and lightness for an airy crumb.
- Salt: Enhances all the sweet flavors without overpowering.
- Granulated Sugar: Sweetens the batter, while brown sugar can add moistness and depth.
- Vegetable Oil: Keeps the cake moist and tender, with coconut oil as a lighter alternative.
- Eggs: Provide structure and richness; vegan substitutes work too.
- Buttermilk: Adds a subtle tang that balances the sweetness and tenderizes the crumb.
- Vinegar: Reacts with baking soda to create lightness and enhances red velvet color.
- Vanilla Extract: Infuses a warm, comforting aroma that lifts every bite.
- Red Gel Food Coloring: Delivers the vibrant signature red that’s key to red velvet cakes.
- Cream Cheese: The heart of the cheesecake layer and frosting, adding that telltale tang and creaminess.
- Sour Cream: Adds moisture and richness to the cheesecake filling.
- Heavy Cream: Whipped into the frosting to create a light, fluffy texture.
- Powdered Sugar: Sweetens the frosting to a silky smooth finish.
- Mixed Berry Jam: Gives a fruity, glossy drip that brightens the cake visually and flavor-wise.
- Dark Chocolate Chips: Add bite-sized bursts of chocolate intensity for decoration.
- Red Velvet Crumbs: Perfect for a finishing decorative touch that echoes the cake layers.
How to Make Irresistible Red Velvet Cheesecake Layer Cake to Wow Your Guests Recipe
Step 1: Prepare the Chocolate Cookie Crust
Start by mixing the chocolate cookie crumbs with melted unsalted butter until the mixture feels crumbly and holds together when pressed. Press this mixture firmly into the bottom of a 9-inch springform pan to create the crunchy base. Bake the crust at 350°F for 10 minutes and then set it aside to cool completely. This step forms a solid, flavorful foundation that contrasts beautifully with the cheesecake layer.
Step 2: Bake the Red Velvet Cake Layers
Next, preheat your oven to 350°F. In one bowl, whisk together the dry ingredients: flour, cocoa powder, baking soda, baking powder, and salt. In another large bowl, combine the sugar, oil, eggs, buttermilk, vinegar, vanilla extract, and the star ingredient—red gel food coloring. Carefully fold the dry mixture into the wet until just combined to keep the batter light. Divide the batter evenly into two greased pans, then bake each for 25 to 30 minutes. Once baked, remove from oven and allow the red velvet layers to cool completely to ensure a clean assembly later.
Step 3: Bake the Cream Cheese Layer
While the red velvet layers chill, whip up the cheesecake filling. Beat cream cheese and powdered sugar together until smooth and creamy. Then, add eggs one by one, stir in vanilla, and gently fold in sour cream. Pour this creamy filling over the cooled chocolate cookie crust or into a lined pan if baking separately. Bake at 325°F for about 40 to 45 minutes. The cheesecake should be set but still have a slight jiggle at the center. After baking, let it cool at room temperature before refrigerating until fully chilled.
Step 4: Assemble the Cake
Now comes the fun and rewarding part! Place one red velvet cake layer on your serving plate and generously spread the cream cheese frosting on top. Carefully add the cheesecake layer next, followed by the second red velvet cake layer. Finally, frost the entire cake with the remaining cream cheese frosting for that classic, silky finish that everyone loves. This assembly balances the rich cake and cool cheesecake perfectly.
Step 5: Add Finishing Touches
Warm the mixed berry jam with a splash of water and lemon juice just until pourable, creating a glossy, vibrant topping. Drizzle the warm jam over the top, letting it artfully drip down the sides. Sprinkle dark chocolate chips and red velvet crumbs over the cake for added texture and a gorgeous presentation that’s guaranteed to wow your guests.
How to Serve Irresistible Red Velvet Cheesecake Layer Cake to Wow Your Guests Recipe
Garnishes
An elegant cake deserves thoughtful garnishes. While the mixed berry jam and chocolate chips in the recipe shine as a finishing touch, fresh berries like raspberries or strawberries add vibrant freshness. A light dusting of powdered sugar or edible gold flakes can add an extra dash of pizazz sure to impress.
Side Dishes
This cake is rich and indulgent, so pairing it with light accompaniments is ideal. A simple bowl of fresh berries, a dollop of whipped cream, or a refreshing mint-infused iced tea complements the flavors without overwhelming your palate. These sides create a balanced and inviting dessert experience.
Creative Ways to Present
Presentation can take your Irresistible Red Velvet Cheesecake Layer Cake to Wow Your Guests Recipe from fantastic to unforgettable. Try serving individual slices on decorative plates with a drizzle of berry sauce. For parties, cut mini squares and serve them in cupcake liners topped with chocolate chips and a berry. Using a cake stand elevates the cake’s visual allure, literally and figuratively!
Make Ahead and Storage
Storing Leftovers
After the festivities, store any leftover cake covered loosely with plastic wrap or in an airtight container in the refrigerator. The cream cheese frosting and cheesecake layers keep fresh for up to 4 days when properly refrigerated, making for delicious treats later.
Freezing
If you want to save some for another special occasion, this cake freezes beautifully. Wrap tightly in plastic wrap and then aluminum foil to prevent freezer burn. When you’re ready to enjoy it, thaw the cake overnight in the refrigerator for the best texture and flavor retention.
Reheating
Because this cake features cream cheese frosting and cheesecake, reheating isn’t recommended as it changes texture and may cause separation. Serve chilled or at room temperature for the best taste and consistency.
FAQs
Can I make this cake vegan or gluten-free?
Absolutely! By substituting dairy-free butter and cream cheese alternatives, using flax eggs or applesauce, and opting for gluten-free flour blends, you can customize this Irresistible Red Velvet Cheesecake Layer Cake to Wow Your Guests Recipe to fit dietary preferences without sacrificing flavor.
How do I prevent the cheesecake from cracking?
A common tip is to bake the cheesecake layer in a water bath or ensure the oven temperature is steady and not too hot. Also, avoid overmixing the batter and cool the cheesecake gradually to minimize cracks.
Is red gel food coloring necessary?
Red gel food coloring is recommended because it gives vibrant, true red color without altering the batter’s consistency. Liquid dyes tend to dilute the batter and deliver a less intense color.
Can I prepare parts of this cake in advance?
Yes! The crust and cheesecake layers can be baked a day ahead and refrigerated. The cake layers also store well overnight. Assemble and frost the cake a few hours before serving for best results.
What is the best way to serve leftover cake?
Keep the cake refrigerated and serve slices chilled or at room temperature. Leftovers also make fantastic layered parfaits when chopped and combined with whipped cream or fresh berries.
Final Thoughts
There’s something truly special about making and sharing an Irresistible Red Velvet Cheesecake Layer Cake to Wow Your Guests Recipe—it’s the kind of dessert that creates smiles, sparks compliments, and makes memories around the table. Don’t be intimidated by its layers and textures; each step is rewarding and leads to a spectacular result. So go ahead, treat yourself and your loved ones to this extraordinary cake that celebrates flavor, color, and the joy of baking together.
Print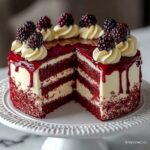
Irresistible Red Velvet Cheesecake Layer Cake to Wow Your Guests Recipe
- Prep Time: 45 minutes
- Cook Time: 1 hour 40 minutes
- Total Time: 2 hours 25 minutes
- Yield: 12 servings
- Category: Dessert
- Method: Baking
- Cuisine: American
Description
This Irresistible Red Velvet Cheesecake Layer Cake combines the rich, velvety texture of red velvet cake with a creamy, tangy cheesecake layer. Topped with a luscious cream cheese frosting, mixed berry jam drizzle, and garnished with chocolate chips and red velvet crumbs, this show-stopping dessert is perfect for special occasions and guaranteed to wow your guests.
Ingredients
Crust
- 2 cups Chocolate Cookie Crumbs (Substitute with crushed graham crackers if needed)
- 1/2 cup Unsalted Butter (Opt for dairy-free alternatives for a vegan version)
Red Velvet Cake Layers
- 2 cups All-Purpose Flour (Gluten-free flour blends work well for gluten-free needs)
- 1 cup Cocoa Powder (Dark cocoa enriches taste)
- 1 teaspoon Baking Soda
- 1 teaspoon Baking Powder
- 1 teaspoon Salt
- 1.5 cups Granulated Sugar (Brown sugar can provide additional moisture)
- 1 cup Vegetable Oil (Melted coconut oil can lighten it up)
- 2 large Eggs (Flax eggs or applesauce can be used as substitutes)
- 1 cup Buttermilk (Regular milk mixed with lemon juice or vinegar can be used)
- 1 tablespoon Vinegar (Omit if using buttermilk)
- 2 teaspoons Vanilla Extract (Pure extract works best)
- 1 ounce Red Gel Food Coloring (Avoid liquid dyes for color intensity)
Cheesecake Layer
- 16 ounces Cream Cheese (Full-fat cream cheese is recommended)
- 1/2 cup Sour Cream (Greek yogurt can serve as a substitute)
- 2 cups Powdered Sugar
- 2 large Eggs
- 2 teaspoons Vanilla Extract
Frosting and Garnish
- 1 cup Heavy Cream (Coconut cream is a great dairy-free option)
- 1/2 cup Mixed Berry Jam (Swap with other jams or fresh berries)
- 1/2 cup Dark Chocolate Chips
- 1/2 cup Red Velvet Crumbs (Use for decoration)
Instructions
- Prepare the crust: Mix chocolate cookie crumbs with melted unsalted butter in a bowl until the mixture becomes crumbly. Press this mixture firmly into the bottom of a 9-inch springform pan. Bake the crust at 350°F (175°C) for 10 minutes and then let it cool completely.
- Make the red velvet cake batter: Preheat the oven to 350°F (175°C). In one bowl, sift together the flour, cocoa powder, baking soda, baking powder, and salt. In a separate large bowl, whisk granulated sugar, vegetable oil, eggs, buttermilk, vinegar, vanilla extract, and red gel food coloring until fully combined. Gradually fold the dry ingredients into the wet mixture until just combined. Divide the batter evenly into two greased and lined 9-inch round pans.
- Bake the red velvet layers: Bake the two cake layers for 25-30 minutes at 350°F (175°C), or until a toothpick inserted into the center comes out clean. Remove from oven and allow them to cool completely on wire racks.
- Prepare the cheesecake layer: In a mixing bowl, beat the cream cheese and powdered sugar until smooth and creamy. Add eggs one at a time, mixing well after each addition. Stir in vanilla extract and sour cream until the mixture is homogenous. Pour the cheesecake batter over the cooled cookie crust in the springform pan.
- Bake the cheesecake: Reduce oven temperature to 325°F (160°C). Bake the cheesecake atop the crust for 40-45 minutes until the edges are set but the center still slightly jiggles. Let it cool at room temperature, then refrigerate the cheesecake until thoroughly chilled, at least 4 hours or preferably overnight.
- Assemble the cake: Place one red velvet cake layer on a serving plate. Spread a generous layer of cream cheese frosting over it (made by whipping heavy cream until stiff peaks form and folding in powdered sugar, if desired). Carefully add the chilled cheesecake layer on top of the frosted cake. Place the second red velvet cake layer on top and frost the entire cake evenly with cream cheese frosting.
- Add toppings and garnish: Warm the mixed berry jam slightly with a splash of water and a squeeze of lemon juice until it becomes pourable. Drizzle the jam over the top of the assembled cake, allowing it to drip down the sides. Sprinkle the dark chocolate chips and red velvet crumbs over the top for a decorative finish.
Notes
- You can substitute the chocolate cookie crumbs with crushed graham crackers for a different flavor.
- For a vegan version, use dairy-free butter alternatives, flax eggs, coconut cream, and vegan cream cheese.
- To make it gluten-free, replace all-purpose flour with a gluten-free flour blend.
- Red gel food coloring provides more vibrant color without added liquid that can affect batter texture.
- Chilling the cheesecake layer overnight improves firmness and flavor.
- Use room temperature ingredients for best mixing and texture results.
- The assembly should be done carefully to avoid cracking the cheesecake layer.
- Keep the cake refrigerated if not serving immediately to maintain structure and freshness.

